
Container basics
Containers are the standard for local development and production. They solve the 'it works on my machine' problem by providing a consistent environment for applications to run anywhere.
For years, virtual machines (VMs) were the go-to for isolation. But VMs are heavy, requiring a full operating system for each instance. Containers, on the other hand, share the host OS kernel, making them far more lightweight and efficient. This translates to faster startup times, lower resource consumption, and increased density – you can run many more containers on the same hardware than VMs.
The benefits extend beyond just development. Containers streamline deployment, making it easier to move applications between different environments – from your laptop to a testing server to production. They also simplify scaling, allowing you to quickly spin up new instances to handle increased traffic. It's a shift in how we build and deploy software, and it’s one you need to understand to stay competitive.
I've seen firsthand how adopting containers can drastically reduce deployment friction and improve team velocity. It's not just about the technology itself, but the cultural shift towards more standardized and repeatable processes. It's a tool that empowers developers to focus on writing code, not wrestling with infrastructure.
Standard Docker commands
Docker is the most well-known containerization platform, and mastering its command-line interface (CLI) is essential. Let’s start with the basics. `docker pull` downloads an image from a registry – think of it as downloading a pre-built template for your container. For example, `docker pull nginx` will grab the latest nginx web server image.
Once you have an image, `docker run` creates and starts a container based on that image. You can specify options like port mappings and volume mounts. `docker run -d -p 8080:80 nginx` will run nginx in detached mode (in the background) and map port 8080 on your host machine to port 80 inside the container.
To see what containers are currently running, use `docker ps`. Add the `-a` flag to see all containers, including stopped ones. `docker stop ` gracefully stops a running container, while `docker kill ` forces it to stop immediately. Cleaning up stopped containers is important, and `docker rm ` removes a container.
A container is a duality between a running process and its underlying file system. It encapsulates everything an application needs to function, which is the basis for effective management.
- docker pull: Downloads an image.
- docker run: Creates and starts a container.
- docker ps: Lists running containers.
- docker stop: Stops a running container.
- docker rm: Removes a container.
Basic Docker Hello World Workflow
The hello-world container serves as the perfect introduction to Docker fundamentals. This lightweight image demonstrates the complete container lifecycle from image retrieval to execution and cleanup. These commands form the foundation of container management that every Linux developer should master.
# Pull the official hello-world image from Docker Hub
docker pull hello-world

# Run the hello-world container
docker run hello-world

# List all containers (including stopped ones)
docker ps -a

# Check the logs of the most recent container
docker logs $(docker ps -lq)

# Alternative: Check logs by container name or ID
# docker logs <container_name_or_id>

# Clean up: Remove the container after testing
docker rm $(docker ps -aq --filter ancestor=hello-world)
This sequence demonstrates the core Docker workflow: pulling images from registries, running containers, monitoring their output, and performing cleanup operations. The hello-world image is specifically designed to verify that Docker is properly installed and configured on your Linux system. Once you run the container, it will display a confirmation message and exit, making it ideal for testing your container environment setup.
Images and volumes
Docker images aren't just monolithic entities. They’re built in layers, each representing a change to the previous layer. This layering system is what enables efficient image building and caching. A `Dockerfile` is a text file that contains instructions for building an image. Essential commands include `FROM` (specifies the base image), `RUN` (executes commands during the build process), `COPY` (copies files into the image), and `CMD` (specifies the default command to run when the container starts).
The order of commands in your `Dockerfile` matters. Docker caches each layer, so if a layer hasn’t changed, it reuses the cached version, speeding up the build process. This is why you generally want to put commands that change frequently towards the end of the file. Changes to earlier layers invalidate the cache for subsequent layers.
Data inside a container is ephemeral and disappears when the container stops. To keep data, use volumes. `docker volume create` makes a managed storage location that you can mount using the `-v` flag.
There are two main types of volumes: named volumes and bind mounts. Named volumes are managed by Docker and are generally preferred for portability. Bind mounts, on the other hand, mount a specific directory on your host machine into the container. I find named volumes easier to manage, especially when working across different environments, but bind mounts can be useful for development when you want to directly access files inside the container.
- Dockerfile: A text file containing instructions for building an image.
- docker volume create: Creates a named volume.
- -v flag (docker run): Mounts a volume to a container.
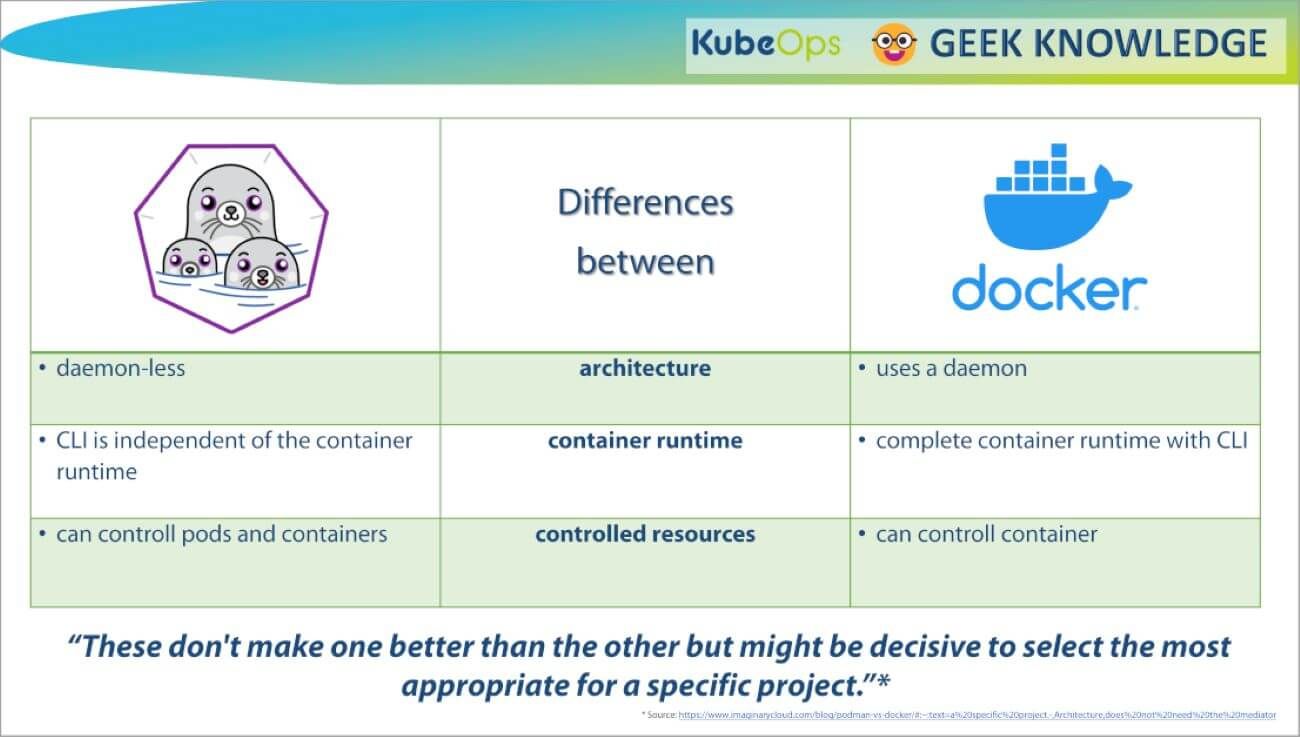
Podman as a daemonless alternative
Podman is an increasingly popular alternative to Docker, and it addresses some of Docker’s architectural limitations. The biggest difference is that Podman is daemonless. Docker relies on a central daemon process to manage containers, which can be a single point of failure and a potential security risk. Podman, on the other hand, runs containers as child processes of your user, eliminating the need for a daemon.
This daemonless architecture has significant security implications. With Docker, the daemon typically runs as root, meaning any vulnerability in the daemon could compromise the entire system. Podman allows you to run containers rootless, reducing the attack surface. This is a major benefit for developers and security-conscious organizations.
The command syntax for Podman is largely compatible with Docker. `podman pull`, `podman run`, `podman ps`, `podman stop`, and `podman rm` all work similarly to their Docker counterparts. This makes it relatively easy to switch between the two. However, there are subtle differences, so it’s important to consult the Podman documentation when needed.
I’ve been experimenting with Podman for several projects, and I’m impressed with its performance and security features. While Docker remains dominant, Podman is a strong contender that offers a compelling alternative, particularly for those prioritizing security and simplicity.
Docker vs. Podman: A Comparative Overview for Developers (2026)
| Architecture | Root Privileges | Security Considerations | Ease of Use | Community & Ecosystem |
|---|---|---|---|---|
| Docker | Requires a central daemon process for managing containers. | Historically, the daemon architecture has presented a larger attack surface, though ongoing security improvements continue. | Mature tooling and a long history contribute to a generally straightforward user experience for common tasks. | Extensive and well-established, with a large number of resources, tutorials, and third-party integrations. |
| Podman | Daemonless architecture; containers are managed directly by the user. | Reduced attack surface due to the absence of a central daemon running with elevated privileges. | Command structure is very similar to Docker, easing the transition for existing Docker users, but may require some adaptation. | Growing rapidly, benefiting from Red Hat's backing, but still smaller than Docker's overall community. |
| Root Access | Typically requires root privileges, or membership in the `docker` group, which effectively grants root access. | Can be run entirely rootlessly, enhancing security by minimizing the potential impact of container escapes. | Rootless operation adds complexity to networking and storage configurations. | Both support rootful and rootless modes, but Podman prioritizes rootless operation. |
| Image Building | Uses `docker build` and Dockerfiles to create images. | Supports building images from Dockerfiles, and also integrates with Buildah for more granular control over image creation. | Buildah offers more flexibility for advanced image building scenarios, but may have a steeper learning curve. | Both tools produce OCI-compliant images, ensuring portability. |
| Container Management | Relies on `docker run`, `docker stop`, `docker rm`, etc. for container lifecycle management. | Employs a similar command set (`podman run`, `podman stop`, `podman rm`) for container management, aiming for Docker compatibility. | Podman introduces the concept of 'pods' for grouping containers, facilitating multi-container application management. | Both provide comprehensive tools for managing container lifecycles. |
| Networking | Docker's networking is relatively complex, involving bridge networks and port mappings. | Podman leverages CNI (Container Network Interface) for flexible and configurable networking options. | CNI provides greater control over network configuration, but requires more expertise. | Both support standard networking protocols and configurations. |
Qualitative comparison based on the article research brief. Confirm current product details in the official docs before making implementation choices.
Grouping containers with pods
Podman introduces the concept of Pods, which allows you to group multiple containers together and manage them as a single unit. This is similar to Pods in Kubernetes, but much simpler. Containers within a Pod share the same network namespace and can communicate with each other using localhost.
To create a Pod, use `podman pod create `. You can then run containers inside the Pod using `podman pod run `. This is useful for running related services together, such as a web server and a database. For example, you might create a Pod with an nginx container and a PostgreSQL container.
Pods simplify networking and resource management. Instead of having to manually configure networking between individual containers, Podman handles it automatically within the Pod. This makes it easier to deploy and manage complex applications. You can inspect a pod using `podman pod inspect `.
Pods provide a lightweight form of orchestration, allowing you to manage multiple containers as a cohesive unit without the complexity of a full-fledged orchestration platform like Kubernetes. This is a powerful feature that sets Podman apart from Docker.
Creating and Managing Pods with Multiple Containers
Podman's Pod functionality allows you to group multiple containers that share the same network namespace and storage volumes, similar to Kubernetes pods. This approach is particularly useful when you need containers to communicate via localhost or share resources as a single deployable unit.
# Create a Pod with multiple containers using Podman
podman pod create --name webapp-pod --publish 8080:80

# Add a web server container to the Pod
podman run -dt --pod webapp-pod --name nginx-container nginx:alpine

# Add a Redis cache container to the same Pod
podman run -dt --pod webapp-pod --name redis-container redis:alpine

# List all containers in the Pod
podman pod ps
podman ps --pod

# View Pod details and container status
podman pod inspect webapp-pod

# Start the entire Pod (all containers)
podman pod start webapp-pod

# Stop the entire Pod (all containers)
podman pod stop webapp-pod

# Restart the entire Pod
podman pod restart webapp-pod

# Remove individual container from Pod
podman rm redis-container

# Remove the entire Pod and all its containers
podman pod rm -f webapp-pod

# Create Pod with shared volume
podman pod create --name data-pod --publish 3000:3000
podman run -dt --pod data-pod --name app-container -v shared-data:/app/data node:alpine
podman run -dt --pod data-pod --name backup-container -v shared-data:/backup alpine
When working with Pods, all containers share the same network interface and can communicate with each other using localhost. The Pod acts as a management boundary - starting, stopping, or removing the Pod affects all containers within it. This makes Pods ideal for microservice architectures where related services need tight integration while maintaining container isolation for individual components.
Networking and Port Management
Containers need to be able to communicate with each other and with the outside world. Docker and Podman handle networking using different modes. The default is the bridge mode, which creates a virtual network interface for each container. Containers on the same network can communicate with each other using their IP addresses.
To expose a service running inside a container to the host machine, you use the `-p` flag during `docker run` or `podman run`. This maps a port on the host machine to a port inside the container. For example, `-p 8080:80` maps port 8080 on the host to port 80 inside the container, allowing you to access the service using `
Other networking modes include host mode, which shares the host’s network namespace with the container, and none mode, which disables networking for the container. Host mode provides the best performance but sacrifices isolation. None mode is useful for containers that don’t need network access.
Understanding container networking is crucial for building and deploying multi-container applications. Properly configuring port mappings and network modes ensures that your services are accessible and can communicate with each other effectively.
Content is being updated. Check back soon.
Essential Commands: A Quick Reference
Here's a side-by-side comparison of the most frequently used Docker and Podman commands. As you can see, the syntax is remarkably similar, making it easy to transition between the two.
This table isn’t exhaustive, but it covers the core commands you’ll use on a daily basis. Refer to the official documentation for a complete list of options and features.
Remember that while the commands are similar, there might be subtle differences in behavior. Always test your commands thoroughly to ensure they’re working as expected.
- Pull Image | docker pull | podman pull
- Pull Image | `docker pull ` | `podman pull `
- Run Container | `docker run ` | `podman run `
- List Containers | `docker ps` | `podman ps`
- Stop Container | `docker stop ` | `podman stop `
- Remove Container | `docker rm ` | `podman rm `
- Inspect Container | `docker inspect ` | `podman inspect `
Essential Books and Courses for Docker and Podman Mastery

Comprehensive guide from beginner to advanced Docker concepts · Covers essential Docker commands and workflows · Focuses on practical application and real-world scenarios
This book provides a thorough understanding of Docker, starting from the basics and progressing to more advanced topics, making it ideal for developers new to containerization.

Detailed explanation of Podman's architecture and features · Covers core Podman commands for building, running, and managing containers · Highlights Podman's daemonless approach and security benefits
This reference offers a deep dive into Podman, essential for developers looking to leverage its daemonless and security-focused container management capabilities.

Covers fundamental Docker concepts and practical usage · Includes guidance on building, testing, and shipping containerized applications · Explains integration with Kubernetes for orchestration
This edition focuses on the foundational aspects of Docker and its integration with Kubernetes, providing developers with the skills to manage container lifecycles effectively.

Practical guidance on building, securing, and orchestrating containers with Docker · Covers essential skills for both developers and DevOps professionals · Addresses real-world challenges and best practices in containerization
This practical guide equips developers and DevOps teams with the necessary skills to build, secure, and orchestrate containers, offering a comprehensive approach to containerization.
As an Amazon Associate I earn from qualifying purchases. Prices may vary.
Evolution of Containerization Technologies
| Year (Approximate) | Technology | Key Characteristics | Impact/Significance |
|---|---|---|---|
| 1979 | chroot | Changes the root directory for a process, providing a degree of isolation. | Early form of process isolation; foundational for later container technologies. |
| 2000s | Linux Containers (LXC) | Utilizes cgroups and namespaces to create isolated environments. System-level virtualization. | Offered improved isolation compared to chroot, but required root privileges and lacked standardized packaging. |
| 2013 | Docker | Introduced a standardized packaging format for applications and their dependencies. Emphasized ease of use and portability. | Revolutionized application deployment by simplifying the process and promoting consistency across environments. |
| 2014 | Kubernetes | Container orchestration platform for automating deployment, scaling, and management of containerized applications. | Enabled large-scale container deployments and complex application management. |
| 2016 | Podman | Daemonless container engine. Focuses on security and compatibility with OCI standards. | Provides an alternative to Docker, addressing some security concerns and offering rootless container support. |
| 2020s - Present | Kata Containers | Lightweight virtual machines that provide strong isolation using hardware virtualization. | Offers enhanced security by running containers within VMs, mitigating potential kernel vulnerabilities. |
| 2026 (Projected) | Continued focus on Serverless Containers | Combining the benefits of containers with serverless computing. Automated scaling and pay-per-use models. | Expected to further simplify application deployment and reduce operational overhead. |
Illustrative comparison based on the article research brief. Verify current pricing, limits, and product details in the official docs before relying on it.
No comments yet. Be the first to share your thoughts!