

Kickstarting Your Journey with Rufus for Linux 🚀
Ever found yourself in the deep end of the Linux pool, wishing you had a lifeboat? That's where Rufus comes in. It's not just a tool, but a lifesaver for Linux users. Rufus, like a loyal retriever, fetches you a linux bootable usb in a jiffy. But why does it matter? Imagine being stranded on a desert island with a laptop and a Linux ISO but no internet. Sounds like a geek's worst nightmare, right? That's when a bootable USB becomes your message in a bottle.
Now, if you're wondering how to use Rufus on Linux, we've got your back. This linux Rufus tutorial is your compass, guiding you through the rough seas of Linux. We'll be your lighthouse, illuminating the way to your destination. So, buckle up and get ready for a thrilling journey of discovery and learning with our Rufus for Linux guide.
Remember, every Linux user starts as a beginner. But with the right tools, like Rufus, you can navigate your way to becoming a seasoned Linux sailor. Ready to set sail?
Unleashing the Power: Rufus for Linux Features 🎁
Imagine a tool that not only creates bootable USBs but does so with a finesse that leaves you marveling at its simplicity. Welcome to the world of Rufus! This tiny yet mighty utility is a game-changer in the Linux universe. Its magic lies in its ability to transform your ordinary USB drive into a live Linux machine. But that's just the tip of the iceberg! 🧊
Ever found yourself in a pickle trying to work on a system that lacks an OS? With Rufus, you can breathe easy. It's your knight in shining armor, rescuing you from such distressing situations. It allows you to carry your favorite Linux distro in your pocket and use it on the go. How cool is that? 😎
But wait, there's more! Rufus is not just about creating Linux bootable USBs. It's a versatile tool that supports a wide range of ISOs, including Windows, Linux, UEFI, and more. It's like a Swiss army knife for creating bootable USBs. So, whether you're a newbie dipping your toes in the Linux sea or a seasoned pro, this linux rufus tutorial is your compass to navigate the exciting world of Rufus.
Feature Comparison: Rufus vs Other Similar Tools
Now that we've explored the features and capabilities of Rufus, let's see how it stacks up against other similar tools in the market.
| Features | Rufus | UNetbootin | Etcher | USBImager |
|---|---|---|---|---|
| User Interface | Simple and intuitive | Moderately easy to use | Sleek and modern | Minimalistic |
| Supported OS | Windows, Linux (via Wine) | Windows, Linux, Mac | Windows, Linux, Mac | Windows, Linux, Mac |
| Persistent Storage Support | Yes | Yes | No | No |
| Write Speed | Fast | Moderate | Slow | Fast |
| ISO and DD Images Support | Yes | Yes | Yes | Yes |
| Free and Open Source | Yes | Yes | Yes | Yes |
| Portability (No installation required) | Yes | No | No | Yes |
| Multiple Boot Configurations | Yes | No | No | No |
Having compared Rufus with other tools, it's clear that Rufus stands out in many aspects. Now, let's move on to the installation process of Rufus on Linux.
Your Adventure Begins: Installing Rufus on Linux 🛠️
So, you're ready to install Rufus on your Linux system? Great! Let's dive right in and get started.
Installing Rufus on Linux: A Step-by-Step Journey


Learn more about 🐧 Installing Rufus on Linux: A Step-by-Step Journey or discover other DG Micro guides.
And there you have it! Rufus is now installed on your Linux system. In the next section, we'll look at some command line codes that you can use with Rufus.
Installing Rufus on Linux
Alright, let's dive right into the installation process. Open your terminal and type the following commands to add the Rufus repository, update your system, and finally, install Rufus.
sudo add-apt-repository ppa:br3nt/br3nt
sudo apt-get update
sudo apt-get install rufus
Voila! You've successfully installed Rufus on your Linux system. Now, you can easily create bootable USB drives. Remember, the world of programming is all about exploring and learning, so don't hesitate to dive deeper and understand what each command does.
Mastering the Art: Creating Bootable USBs with Rufus 💾
Now that you're a Rufus installation wizard, it's time to dive into the real magic - creating a Linux bootable USB with Rufus. Ever been stuck with a non-booting system? Or maybe you're just itching to try out the latest Linux distro? With Rufus in your toolkit, these tasks become as simple as a walk in the park.
But how exactly do we transform a plain USB stick into a powerful Linux bootable device? Well, that's where our linux Rufus tutorial comes into play. We'll guide you through the process, like a seasoned explorer leading an expedition into the wild unknown. Ready to embark on this adventure?
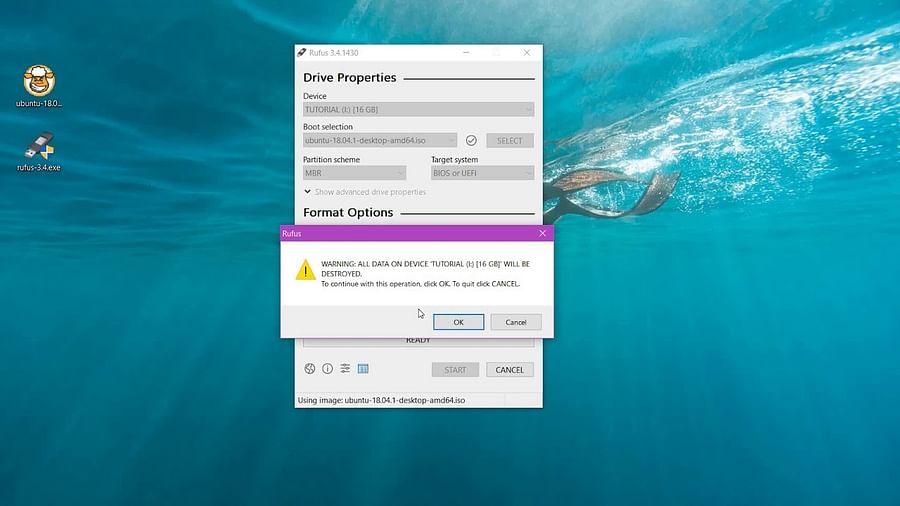
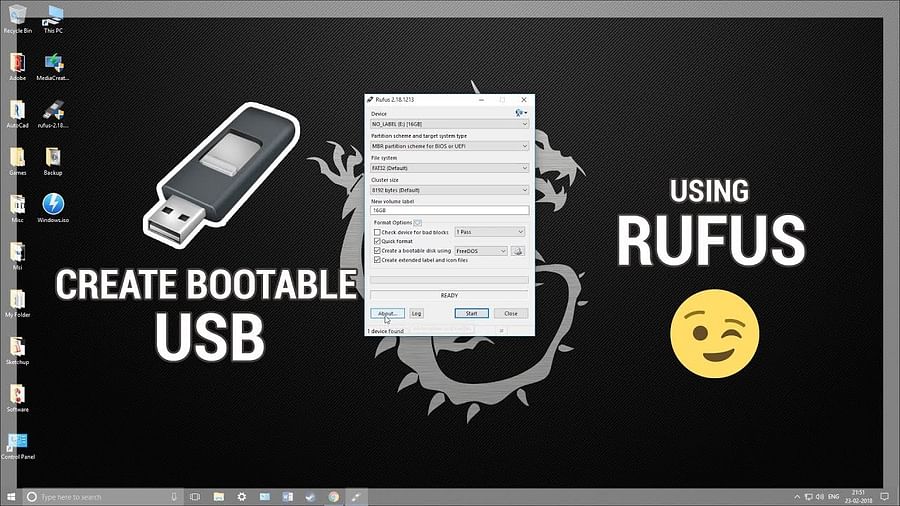
First, plug in your USB stick and launch Rufus. You'll notice a clean, user-friendly interface. Don't let its simplicity fool you though, this tool packs a punch! Select your USB under 'Device', pick your Linux ISO file, and let Rufus work its magic.
And voila! In a matter of minutes, you've got a Linux bootable USB, ready to breathe life into any system. Now, wasn't that easier than you thought? Stay tuned for the next section where we’ll tackle some common Rufus hiccups and their solutions.
Now that we've installed Rufus, it's time to put it to work. Let's dive into the process of creating a bootable USB using Rufus.
Mastering Rufus: Creating a Bootable USB in Linux


Learn more about Mastering Rufus: Creating a Bootable USB in Linux or discover other DG Micro guides.
And there you have it! You've successfully created a bootable USB using Rufus. In the next section, we'll look at some command line codes you can use with Rufus.
Creating a Bootable USB with Rufus for Linux
Before we dive into the code, make sure you have a backup of anything important on your USB drive. This process will completely wipe it! Also, replace '/path/to/your/image.iso' with the actual path of your ISO file and '/dev/sdx' with your USB drive. Let's get adventurous and create that bootable USB!
sudo dd bs=4M if=/path/to/your/image.iso of=/dev/sdx status=progress oflag=sync
And there you have it! With this command, you've just created a bootable USB. Remember, the process can take a few minutes, so grab a cup of coffee while you wait. Once it's done, you're ready to boot from your USB!
No More Hiccups: Solving Common Rufus Dilemmas 🚫
So, you've mastered the art of creating a Linux bootable USB with Rufus, huh? But, let's face it, even the most seasoned Linux adventurers can sometimes stumble upon a tricky Rufus riddle. Fear not, for we've got your back!
One common hiccup you might face is Rufus not recognizing your USB drive. This usually happens when your USB is formatted in a file system that Rufus doesn't support. The solution? Simply reformat your USB into a Rufus-friendly file system like FAT32, and you'll be back on track.
Another common issue is Rufus failing to create a bootable USB. This could be due to an outdated version of Rufus or a corrupted ISO file. To fix this, make sure you're using the latest version of Rufus and your ISO file is downloaded from a reputable source.
So, are these the only problems you might face while using Rufus on Linux? Certainly not. But, isn't it thrilling to tackle these challenges on your own, armed with the knowledge from this Linux Rufus tutorial? Remember, the journey to mastering Rufus for Linux isn't always smooth, but it's always rewarding!
Now that we've discussed some common problems and their solutions, let's address some frequently asked questions about Rufus for Linux.
Hopefully, these FAQs have cleared up any lingering questions you might have about Rufus for Linux. Now, let's wrap things up with some final thoughts.
Your Rufus for Linux Journey: The Road Ahead 🛣️
And there we have it, fellow adventurers of the digital landscape, the end of our journey through the wonderland of Rufus for Linux. Yet, as we all know, the end of one journey is but the dawn of the next. So, why not let that next journey be your own exploration of Rufus?
Imagine, with the help of our linux rufus tutorial, you, too, could be creating a linux bootable USB with rufus, with the confidence of a seasoned explorer. The ability to navigate through the wilderness of operating systems, to tame the wild beast that is technology, all lies at your fingertips.
So, why wait? Embark on your own expedition, guided by our rufus for linux guide. Discover firsthand the versatility, the power, and the sheer utility of Rufus. And remember, in the vast expanse of the digital world, only those who dare to learn, to explore, to push boundaries, truly experience the thrill of the journey. So, I ask you, are you ready to venture into the unknown, to learn how to use rufus on linux, and to take control of your technological destiny?
As our parting gift, we leave you with one last piece of advice: the best way to learn is by doing. So, go forth, intrepid explorer. Download Rufus, create your first bootable USB, and let your journey begin!
What is your experience with Rufus for Linux?
We're curious about your journey with Rufus! Whether you're a newbie or a seasoned user, we'd love to hear about your experience.

No comments yet. Be the first to share your thoughts!